Corrosion under insulation (CUI) is a severe form of localized corrosion that develops in carbon and low alloy steel piping and equipment. It take place when water accumulates under insulation and penetrates into broken coating. CUI is a widespread and difficult to predict failure mechanism in piping systems of refineries, oil and process plants. Many CUI damages remain undetected, causing unexpected failures, product loss and severe environmental damage. At the same time, inspection of insulated piping is limited due to high costs, especially in a case of underground piping or piping with asbestos insulation.
Different methods have been developed and applied during the recent decades for non-destructive evaluation of pipelines. Among these methods, acoustic emission technology is unique as it not only detects flaws but also is used for on-line, real time monitoring of structural integrity without insulation removal, interruption of operation, cleaning, or product evacuation.
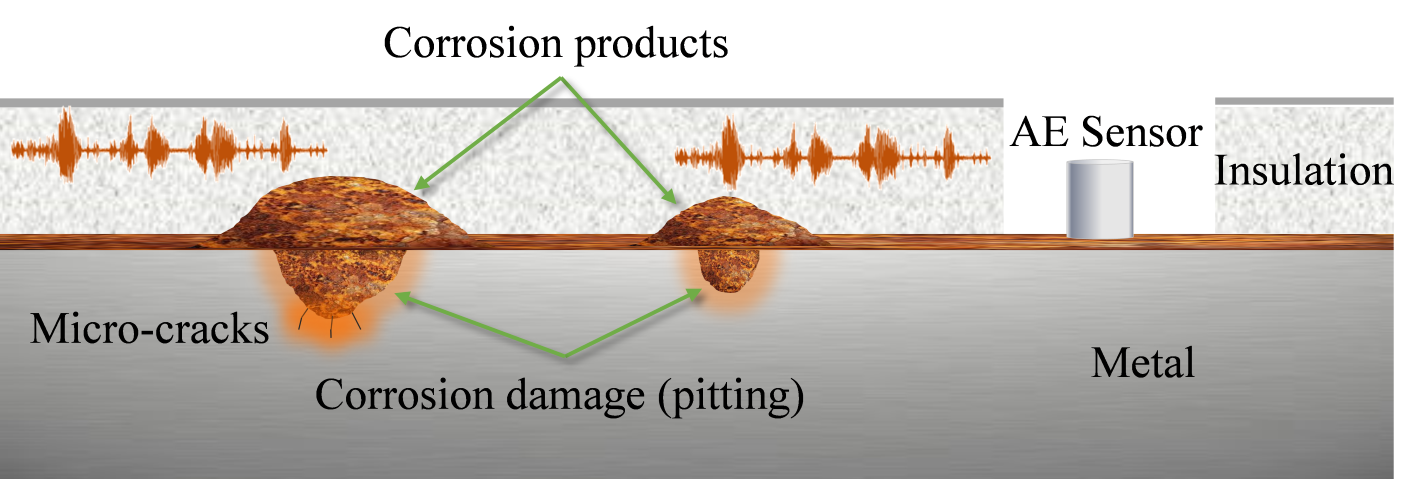
Acoustic emission technology allows detection of both accumulation of corrosion rust products and corrosion flaws such as pitting and cracks (Figure 1). Iron oxide films fracturing and peeling are the main sources of acoustic emission related to corrosion products accumulation and are effectively detected by acoustic emission technology at pressures below operational pressure levels and during relatively short monitoring periods. At the same time, effective detection of pittings and cracks requires longer monitoring under maximum operational pressure conditions. The main sources of acoustic emission related to pitting and cracks are local plastic deformation development at pitting tips and elementary micro-scopic crack development.
Figure 1. Illustration of corrosion under insulation.
How Acoustic Emission Technology is Applied?
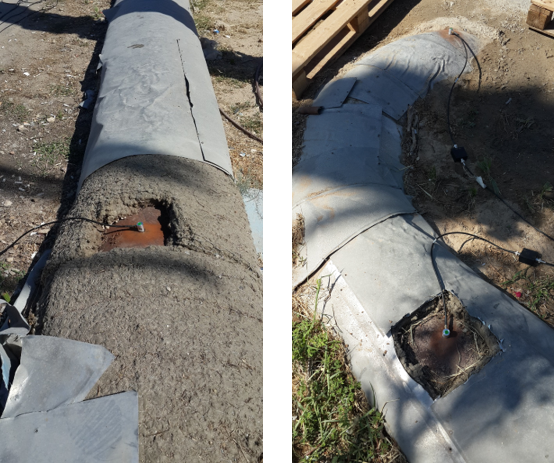
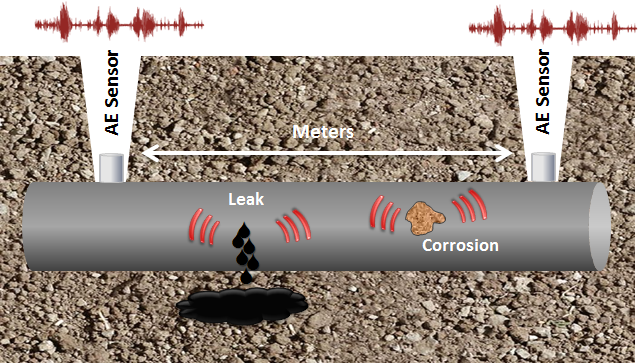
During examination, small holes are made in insulation every several meters (several meters for crack and corrosion detection and from 25 to 100 meters for leak detection). Piezo-electric sensors are installed directly on the pipe surface and piping is monitored for flaw development and leaks for several hours using multi-channel AE equipment (Figures 2 and 3).
Figure 2. AE sensors installed along insulated piping.
Figure 3. Illustration of application of AE technology for underground piping.
Data analysis and interpretation
After monitoring is completed, analysis and interpretation of AE data is performed in order to:
- Detect indications of growing discontinuities and corrosion damage in the piping (Figure 4).
- Assess significance of flaw-indications to the structural integrity of the piping.
Analysis of acoustic emission data measured during the test is focused on:
- Detection: Detection of AE activity was done by application of fixed amplitude threshold, equal for all measurement channels.
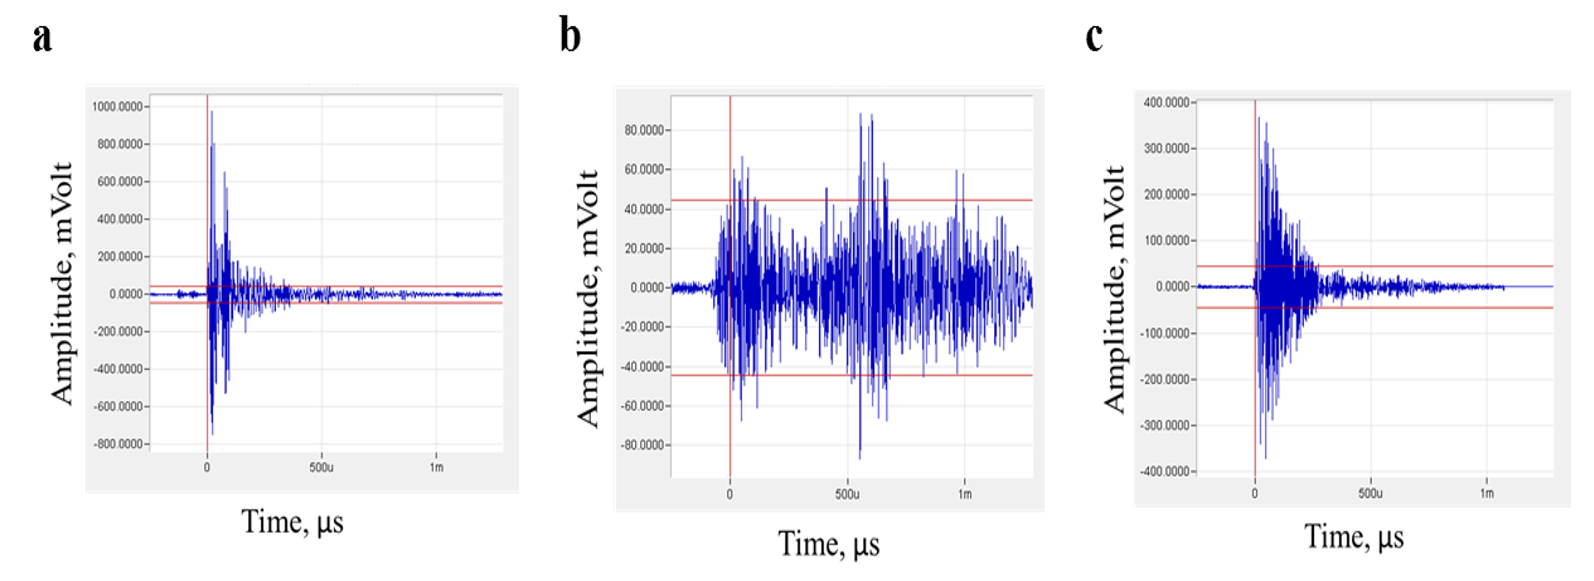
- Filtering frictional and other mechanical noises, not related to AE activity due to possible flaw development. Flaw suspected activity is selected based on signal’s rise time, duration, peak amplitude and energy values after source-to-sensor distance correction (Figure 4).
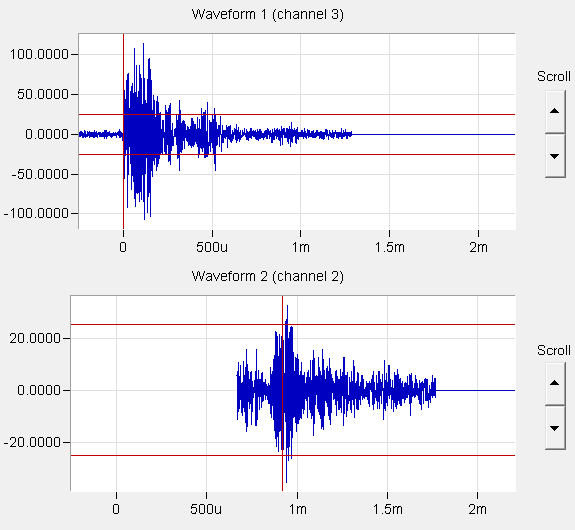
- Location: Linear time-difference of wave arrival locations are performed to evaluate source location whenever is practical. In other cases zone location is performed (Figures 5 and 6).
- Indication assessment: Analysis of total number of AE hits, their energy, amplitude, frequency characteristics and AE activity vs. location vs. pressure is performed to assess revealed indications.
As a result, different flaw mechanisms are identified and located to provide a map of corrosion damage and it severity to the structural integrity of the pipeline.
Figure 4. AE signal suspected to iron oxide fracture (a), local plastic deformation development around stress concentrators including pitting (b), micro-cracking (c).
Figure 5. Example of AE event location along a piping section using two sensors.
Figure 6. Example of corrosion under insulation mapping along a piping section.
Acoustic Emission Standardization
Acoustic Emission one of the standard non-destructive test methods with several dozens of standards, procedures and test methods issued by various international organizations such as ASTM, ASME, EN and others. Here some of the relevant standards, codes and documents:
- ASTM E 1930 Standard Practice for Examination of Liquid-Filled Atmospheric and Low-Pressure Metal Storage Tanks Using Acoustic Emission.
- ASTM E 1211 Standard Practice for Leak Detection and Location Using Surface-Mounted Acoustic Emission Sensors.
- BS EN 15856 Non-Destructive Testing. Acoustic Emission. General Principles of AE Testing For the Detection of Corrosion within Metallic Surrounding Filled With Liquid.
- HPIJ, A Recommended Practice for Acoustic Emission Testing For Corrosion in the Bottom Plate of Aboveground Tanks, 2005.
- BS EN 14584 Non-Destructive Testing. Acoustic Emission. Examination of Metallic Pressure Equipment during Proof Testing. Planar Location of AE Sources.
- BS EN 15495 2007 Non-Destructive Testing. Acoustic Emission. Examination of Metallic Pressure Equipment during Proof Testing. Zone Location of AE Sources.
- ASTM E 569 Standard Practice for Acoustic Emission Monitoring Of Structures during Controlled Stimulation.
- ASTM E 650 Guide for Mounting Piezoelectric Acoustic Emission Sensors.
- ASTM E 750 Standard Practice for Characterizing AE Instrumentation.
- ASTM E 976 Guide for Determining the Reproducibility of Acoustic Emission Sensor Response.
- ASTM E 1316 Terminology for Nondestructive Examinations.
- ASTM E 2374 Guide for Acoustic Emission System Performance Verification.
- ASME Standard: Section V, Article 12, Boiler & Pressure Vessel Code, Acoustic Emission Examination of Metallic Vessels during Pressure Testing.
- ASME Standard: Section V, Article 13, Boiler & Pressure Vessel Code, Continuous Acoustic Emission Monitoring.
AE Unique Advantages – Increased Safety with Excellent Money Saving
- Examination of 100% of structure.
- No need to remove insulation.
- No need to evacuate product.
- No cleaning.
- Reliable detection flaws and leaks.
- Evaluation of flaw propagation rate.
- Differentiating between developing and non-developing flaws.
- Quantitative long-term monitoring of flaws.
- Prioritization of pipe sections for maintenance and repair.
